Showing posts with label drupal. Show all posts

Tuesday, January 27, 2015

Add a new configurations block to admin/config

We have frequent requirement to create admin form in Drupal.

Below is the simple example to create admin configuration block for your setting form.

$items['admin/config/myblk'] = array(
'title' => 'Title of the block',
'description' => 'description',
'position' => 'left',
'weight' => -25,
'page callback' => 'system_admin_menu_block_page',
'access arguments' => array('access administration pages'),
);
$items['admin/config/myblk/myblk-setting'] = array(
'title' => 'Link to settings',
'description' => 'Description about link',
'page callback' => 'drupal_get_form',
'page arguments' => array('call_your_setting_form'),
'access arguments' => array('administer authentication'),
'weight' => 10, );

Friday, September 19, 2014

PHP create XML file

Pragmatically create XML using PHP.

  $xml = "<company>";
  $xml .= "<employee>";
  $xml .= "<id>100</id>";  
  $xml .= "<name>name</name>";
  $xml .= "<email>email</email>";  
  $xml .= "<salary>salary</salary>";    
  $xml .= "</employee>";  
  $xml .= "</company>";
  $xml_obj = new SimpleXMLElement($xml);
  $xml_obj->asXML('public://myfile.xml'); // Drupal file path.


Wednesday, August 27, 2014

Drupal feeds batch import - Feeds batch process

Feeds module is a one of the best module to import nodes from external URL, xls file or from  xml file, etc..

After creating feeds import for particular action, we can run it via batch process. Like via cron instead of running it manually.

I will create new post to create about feeds import.

Below line of codes worked perfect for one of  my project:

$file = 'your-xml-file.xml';
$my_importer = feeds_source('your_importer_name');
$config = array('FeedsFileFetcher'=>array('source'=>'sites/default/files/' . $file));
$my_importer->addConfig($config);
while (FEEDS_BATCH_COMPLETE != $my_importer->import());

use below link to integrate above batch process via cron.

http://kali-dasan.blogspot.in/2014/08/drush-custom-command-drush-in-our.html

Tuesday, August 19, 2014

Drush custom command - Drush in our custom module

Drush is a very powerful command line tool to manage Drupal site.

Other than core Drush command, we can also write our own custom drush command to perform some task like cron setup, etc, ...

we can do it by using below 3 steps.

Steps :
1) Write hook_drush_help.
2) Write hook_drush_command.
3) Write drush_hook_command.

1) hook_drush_help.
/**
 * Implements hook_drush_help().
 */
function my_module_drush_help($command) {
  switch ($command) {
    case 'drush:test-import':
     return dt('Import test contents.');
  }
}

2) hook_drush_command.
/**
 * Implements hook_drush_command().
 */
function my_module_drush_command() {
  $items = array();
  $items['test-import'] = array(
    'description' => dt('Import test contents.'),
    'arguments'   => array(
      'arg1'    => dt('An optional example argument'),
    ),
    'examples' => array(
      'Standard example' => 'drush test-import',
      'Argument example' => 'drush test-import 5',
    ),
    'aliases' => array('ti'),
  );
  return $items;
}

3) drush_hook_command.
/**
 * Implements drush_hook_command().
 */
function drush_my_module_test_import($arg = NULL) {
  // print arg if any.
  if (isset($arg)) {
   drush_print($arg);
  } 
  drush_log('importing test contents...', 'ok');
}

Now Goto drush command line interface and try > drush test-import or > drush ti

Monday, July 21, 2014

Drupal 7 ajax without jquery using use-ajax

Using "use-ajax" attribute, we can achieve ajax in Drupal.
Follow below steps to do it.

Steps :
1) hook_menu entry
2) function definition to declare ajax element (Hyperlink)
3) Ajax definition

1) hook_menu entry.
function yourModuleName_menu() {
  $items = array();
  $items['Mymodule/ajax'] = array(
    'page callback' => 'Mymodule_ajax_test',
    'access callback' => TRUE,
    'type' => MENU_CALLBACK,
  );
  $items['Mymodule/ajax/%/%'] = array(
    'page callback' => 'Mymodule_ajax_callback',
    'page arguments' => array(2, 3),
    'access callback' => TRUE,
    'type' => MENU_CALLBACK,
  );
  return $items;
}

2) function definition to declare ajax element (Hyperlink).
function Mymodule_ajax_test() {
  drupal_add_library('system', 'drupal.ajax');
  drupal_add_library('system', 'jquery.form');
  $arg = 'arg';
  $output = l(t('AJAX'), 'pm/ajax/nojs/' . $arg, array('attributes' => array('class' => array('use-ajax'))));
  $output .='<div id="some-wrapper"></div>'; // udadate result here.
  return $output;
}
// Another method.
function Mymodule_ajax_test() {
  drupal_add_library('system', 'drupal.ajax');
  drupal_add_library('system', 'jquery.form');
  $some_argument = 'arg';
  $output = l(t('AJAX'), 'Mymodule/ajax/nojs/' . $arg, array('attributes' => array('class' => array('use-ajax'), 'id' => array('some-wrapper')))); // overwrite result here.
  return $output;
}

3)  Ajax definition.
function Mymodule_ajax_callback($type = 'ajax', $arg) {

 if ($type == 'ajax') {
    $commands[] = ajax_command_replace('#some-wrapper', 'Ajax result '  );
    $page = array('#type' => 'ajax', '#commands' => $commands);
    ajax_deliver($page);
  }
  else {
    $output = t("Ajax fail or page load contents.");
    return $output;
  }
}

Wednesday, June 4, 2014

Drupal date popup in custom form

Lets we see how to integrate date_popup on drupal custom form.
We can achieve it using drupal core functionality.
No need to go for jquery plugin.

Follow below 3 steps to achieve it :
1. custom form entry
2. hook_element_info_alter
3. Js for settings.

1. Create field in your custom form :
$form['birth_date'] = array(
 '#type' => 'date_popup',
 '#date_format' => 'd-m-Y',
 '#title' => t('Birth Date'),
 '#required' => TRUE,
 '#attributes' => array('class' => array('date-picker')),
);

2. hook_element_info_alter() to alter date_popup field. :
// For example :
date_popup by default come with time field. You can hide it.
Similarly you can hide description , title , etc ...
function myModule_element_info_alter(&$type) {
  if (isset($type['date_popup'])) {
    $type['date_popup']['#process'][] = 'myModule_date_popup_process';
  }
}


function myModule_date_popup_process($element, $form_state, $complete_form) {
  unset($element['date']['#description']);
  unset($element['date']['#title']);
  return $element;
}
3. Add below JS file settings. :
(function ($) {
  Drupal.behaviors.custom_js = {
    attach: function(context) {
      $('.date-picker').datepicker({   
        showOn: "both", // Another one option is "button".
        buttonImage: Drupal.settings.datePicker.iconPath + '/images/datepicker-icon.png',
        buttonImageOnly: true,
        dateFormat: "dd-mm-yy",
        changeMonth : true, // To edit month field.
        changeYear : true, // To edit date field.
        yearRange: "-120:",
      }); 
    }
  };
})(jQuery);


Final step is to create Drupal settings to hold theme_path to hold date picker icon image.
// We can get theme path using Drupal settings variable.
global $theme_path;
drupal_add_js(array('datePicker' => array('iconPath' => $theme_path)), 'setting');


Wednesday, May 14, 2014

Autocomplete Drupal Form Tutorial.

I got a chance to use drupal form '#autocomplete_path' attribute to my one of the project.

Example usage :
// Autocomplete field
$form['autocomplete'] = array(

 '#type' => 'textfield',

 '#title' => 'Autocomplete field',

 '#description' => 'Autocomplete field example',

 '#autocomplete_path' => 'article/autocomplete',

  );


I have found one good resource about it at http://www.coalmarch.com/blog/autocomplete-drupal-form-tutorial

It may be useful to you. Happy coding :)

Friday, October 25, 2013

Drupal backup and restore using Drush


Drush is a very poweful command line tool to manage Drupal efficiently.

You can manage your drupal site very well using this tool. 

Starting from Drupal installation, you can 

1) Download themes and modules
2) Enable themes and modules
3) Disable themes and modules
4) uninstall modules
5) Clearing cache
6) Backup root files & database
7) Restore them to new site

Some useful drush commands :

Before running the command, first go to desired directory.

Ex: If you want to enable commerce module, first go to /var/www/docroot/sites/all/modules/contrib
drush dl commerce  - will download the commerce module.
drush en commerce - will enable it
drush uninstall commerce - will uninstall it
drush dis commerce - will disable it&nbsp
drush cc all - will clear all cache&nbsp

Backup and restore :

Backup:

As i said before go to your root directory before running below command.
drush archive-dump --destination=/var/back_up/yoursite_today.com.tar.gz

( or )

drush ard --destination=/var/back_up/yoursite_today.com.tar.gz


 Restore :

drush archive-restore /var/back_up/yoursite_today.com.tar.gz --destination=/var/www/new_site.com

( or )

drush arr /var/back_up/yoursite_today.com.tar.gz --destination=/var/www/new_site.com

When you go to your backup directory, there will be one MANIFEST.ini which will contain backup details as in below.

[Global]
datestamp = "1382704323"
formatversion = "1.0"
generator = "Drush archive-dump"
generatorversion = "6.0-beta1"
archiveformat = "platform"

[default]
docroot = "/var/www/beta_bbd"
sitedir = "sites/default"
files-public = "sites/default/files"
database-default-file = "beta_bbd.sql"
database-default-driver = "mysql"
 
Click here to see more about Drush . Another useful link.


Wednesday, July 17, 2013

Apache Solr Search Integration in Drupal


This article explains how to use Apache Solr as search engine for a Drupal 7 site (it also applies to Drupal 6). I assumes that you are running Debian 6, but the description can also be used on any other Linux based distribution.

Apache Solr is written in Java and we need to start by installing Java, You should note that Apache Solr can be run in a Tomcat installation I do however prefer to not use tomcat, mostly because I don't have much experiences with tomcat.

1) Click here for install and configure  2) This link gives more detailed view about it


Saturday, April 20, 2013

Drupal 7 drupal_goto options query and fragment


Lets we take example url as " product?a=1&b=2#bottom ". Then you should make drupal_goto as below.

API :
drupal_goto($path = '', array $options = array(), $http_response_code = 302)

Explanation as per example url
$path = 'product'
$options = array( 'query' => array('a' =>1,'b'=>2), 'fragment' => 'bottom', );
$http_response_code is optional (described below).
Ex:
drupal_goto($path ,$options); Will produce " product?a=1&b=2#bottom "
More info about response code,

$http_response_code: (optional) The HTTP status code to use for the redirection, defaults to 302. The valid values for 3xx redirection status codes are defined in RFC 2616and the draft for the new HTTP status codes:

301: Moved Permanently (the recommended value for most redirects).
302: Found (default in Drupal and PHP, sometimes used for spamming search engines).
303: See Other.
304: Not Modified.
305: Use Proxy.
307: Temporary Redirect.


Friday, April 12, 2013

Drupal views

 
drupal views
Drupal views

What is Views?


The views module allows administrators and site designers to create, manage, and display lists of content. Each list managed by the views module is known as a "view", and the output of a view is known as a "display". Displays are provided in either block or page form, and a single view may have multiple displays. Optional navigation aids, including a system path and menu item, can be set for each page-based display of a view.

 By default, views may be created that list content (a Node view type), content revisions (a Node revisions view type) or users (a User view type). A view may be restricted to members of specific user roles, and may be added, edited or deleted at the views administration page.


For more technical users, Views can be understood as a user interface to compose SQL-queries and to pull information (Content, Users, etc.) from the database and show it on a screen as desired.

Please use this link to find more about drupal views.


10 cool Drupal modules that integrate with Views


1. Views Slideshow

2. Views Accordion

3. Views Horizontal Slider

4. Masonry

5. Views Showcase

6. Views Infinite Scroll

7. FooTable

8. Views Field View

9. Views UI: Edit Basic Settings

10. Draggable Views


You can find more details from this original post .


Install drush on windows


Drush is a command line shell and scripting interface for Drupal. More


How to install (click here to see more) drush on windows ?


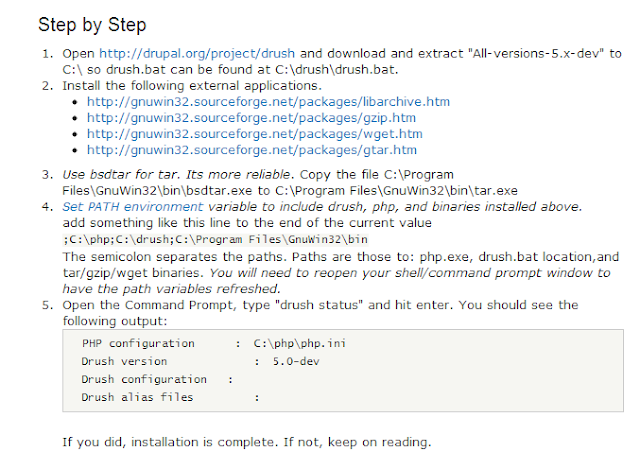
Steps to install :


Very simple steps to install drush on windows.

1) http://drupal.org/node/594744

2) See this image for more help

install drush
You can use the above link to see more


after completing these steps goto step # 3

3) open cmd - goto xamp /htdocs - > drush dl drupal (Will down load drupal package)

4) move to specified path where do you : xamp / htdocs / drupal

5) goto xamp /htdocs/drupal -> drupal si --help

si(site install)

Ex:
drush site-install
--db-url=mysql://root:pass@localhost:port/dbname

6) Example code :

C:\xampp\htdocs\drupal-7.20>drush si standard --db-url=mysql://root:""@localhost
:port/kali --db-su=root --site-name ="kalidas site"

Note : kali is my db name

thats it. Drupal will be installed in your machine.

7) see below image for more help 


install drush on windows
Install drush on windows