Friday, October 25, 2013

Drupal backup and restore using Drush


Drush is a very poweful command line tool to manage Drupal efficiently.

You can manage your drupal site very well using this tool. 

Starting from Drupal installation, you can 

1) Download themes and modules
2) Enable themes and modules
3) Disable themes and modules
4) uninstall modules
5) Clearing cache
6) Backup root files & database
7) Restore them to new site

Some useful drush commands :

Before running the command, first go to desired directory.

Ex: If you want to enable commerce module, first go to /var/www/docroot/sites/all/modules/contrib
drush dl commerce  - will download the commerce module.
drush en commerce - will enable it
drush uninstall commerce - will uninstall it
drush dis commerce - will disable it&nbsp
drush cc all - will clear all cache&nbsp

Backup and restore :

Backup:

As i said before go to your root directory before running below command.
drush archive-dump --destination=/var/back_up/yoursite_today.com.tar.gz

( or )

drush ard --destination=/var/back_up/yoursite_today.com.tar.gz


 Restore :

drush archive-restore /var/back_up/yoursite_today.com.tar.gz --destination=/var/www/new_site.com

( or )

drush arr /var/back_up/yoursite_today.com.tar.gz --destination=/var/www/new_site.com

When you go to your backup directory, there will be one MANIFEST.ini which will contain backup details as in below.

[Global]
datestamp = "1382704323"
formatversion = "1.0"
generator = "Drush archive-dump"
generatorversion = "6.0-beta1"
archiveformat = "platform"

[default]
docroot = "/var/www/beta_bbd"
sitedir = "sites/default"
files-public = "sites/default/files"
database-default-file = "beta_bbd.sql"
database-default-driver = "mysql"
 
Click here to see more about Drush . Another useful link.


Wednesday, July 17, 2013

Apache Solr Search Integration in Drupal


This article explains how to use Apache Solr as search engine for a Drupal 7 site (it also applies to Drupal 6). I assumes that you are running Debian 6, but the description can also be used on any other Linux based distribution.

Apache Solr is written in Java and we need to start by installing Java, You should note that Apache Solr can be run in a Tomcat installation I do however prefer to not use tomcat, mostly because I don't have much experiences with tomcat.

1) Click here for install and configure  2) This link gives more detailed view about it


Tuesday, May 14, 2013

MySQL Database Back up and Restore (Back up From the Command Line)

If you have shell or telnet access to your web server, you can backup your MySQL data by using the mysqldump command. This command connects to the MySQL server and creates an SQL dump file. The dump file contains the SQL statements necessary to re-create the database.

Here is the proper syntax:
$ mysqldump -u [uname] -p[pass] [dbname] > [backupfile.sql]
Code for compressed format:
$ mysqldump -u [uname] -p[pass] [dbname] | gzip > [backupfile.sql.gz] 
If your db server located in remote system, using its IP & port we can take the back up :
$ mysqldump -P 3301 -h 231.200.12.45 -u [uname] -p[pass] [dbname] | gzip > [backupfile.sql.gz] 
Compressed format to store more space. Compare to .sql format, .sql.gz size is very very less. To see it in action, use below command to see the size of both files :
 ll -sh
Take back up of root files :
 tar -pczf filename.tar.gz /your/file/path
To extract this file, use below command :
 tar -zxvf filename.tar.gz 
Import  back sql file. Directly you can import file.sql.gz file into your database. 
use below command to do it.
 gunzip < file.sql.gz | mysql -u [uname] -p[pass] [dbname] 
For more details refer this link.

Saturday, April 20, 2013

Drupal 7 drupal_goto options query and fragment


Lets we take example url as " product?a=1&b=2#bottom ". Then you should make drupal_goto as below.

API :
drupal_goto($path = '', array $options = array(), $http_response_code = 302)

Explanation as per example url
$path = 'product'
$options = array( 'query' => array('a' =>1,'b'=>2), 'fragment' => 'bottom', );
$http_response_code is optional (described below).
Ex:
drupal_goto($path ,$options); Will produce " product?a=1&b=2#bottom "
More info about response code,

$http_response_code: (optional) The HTTP status code to use for the redirection, defaults to 302. The valid values for 3xx redirection status codes are defined in RFC 2616and the draft for the new HTTP status codes:

301: Moved Permanently (the recommended value for most redirects).
302: Found (default in Drupal and PHP, sometimes used for spamming search engines).
303: See Other.
304: Not Modified.
305: Use Proxy.
307: Temporary Redirect.


Tuesday, April 16, 2013

Embed Syntax highlighter in your blog


SyntaxHighlighter is a fully functional self-contained code syntax highlighter developed in JavaScript.

 To integrate it to your blog, just follow the below steps.

1) Login into your blog
2) Goto template -> edit as shown blow

Edit template
 3) Paste the below codes before the </head> tag ends

<link href='http://alexgorbatchev.com/pub/sh/2.1.364/styles/shCore.css' rel='stylesheet' type='text/css'/>
<link href='http://alexgorbatchev.com/pub/sh/2.1.364/styles/shThemeDefault.css' rel='stylesheet' type='text/css'/>
<script src='http://alexgorbatchev.com/pub/sh/2.1.364/scripts/shCore.js' type='text/javascript'></script>
<script src='http://alexgorbatchev.com/pub/sh/2.1.364/scripts/shBrushCpp.js' type='text/javascript'></script>
<script src='http://alexgorbatchev.com/pub/sh/2.1.364/scripts/shBrushCSharp.js' type='text/javascript'></script>
<script src='http://alexgorbatchev.com/pub/sh/2.1.364/scripts/shBrushCss.js' type='text/javascript'></script>
<script src='http://alexgorbatchev.com/pub/sh/2.1.364/scripts/shBrushJava.js' type='text/javascript'></script>
<script src='http://alexgorbatchev.com/pub/sh/2.1.364/scripts/shBrushJScript.js' type='text/javascript'></script>
<script src='http://alexgorbatchev.com/pub/sh/2.1.364/scripts/shBrushPhp.js' type='text/javascript'></script>
<script src='http://alexgorbatchev.com/pub/sh/2.1.364/scripts/shBrushPython.js' type='text/javascript'></script>
<script src='http://alexgorbatchev.com/pub/sh/2.1.364/scripts/shBrushRuby.js' type='text/javascript'></script>
<script src='http://alexgorbatchev.com/pub/sh/2.1.364/scripts/shBrushSql.js' type='text/javascript'></script>
<script src='http://alexgorbatchev.com/pub/sh/2.1.364/scripts/shBrushVb.js' type='text/javascript'></script>
<script src='http://alexgorbatchev.com/pub/sh/2.1.364/scripts/shBrushXml.js' type='text/javascript'></script>
<script src='http://alexgorbatchev.com/pub/sh/2.1.364/scripts/shBrushPerl.js' type='text/javascript'></script>
<script language='javascript'>
SyntaxHighlighter.config.bloggerMode = true;
SyntaxHighlighter.config.clipboardSwf = 'http://alexgorbatchev.com/pub/sh/2.1.364/scripts/clipboard.swf';
SyntaxHighlighter.all();
</script>
 
Note this is pointing to the Latest released version v2.1.364; older versions can be found at: http://alexgorbatchev.com/pub/sh/ 

4)Save the template & open you blog in IE & Firefox to test if any javascript errors are reported as this might conflict with various other embedded scripts in your template.

This completes the direct embedding of SyntaxHighlighter in your Blog. Now lets proceed how to use it in your posts: Usage: For SyntaxHighlighter 2.0 & above: Any code you want to be placed & displayed using SyntaxHighlighter must be enclosed in:

<<span class="IL_AD" id="IL_AD12">script type</span>="syntaxhighlighter" class="brush: html"><![CDATA[
#######YOUR CODE############
]]></script> 
 
Note that we have option of using different brushes for highlighting different type of codes..e.g. HTML/ASP/C++ etc In order to choose the appropriate brush, following are the various brush aliases supporting the corresponding code highlighting: actionscript3 bash, shell c-sharp, csharp cpp, c css     delphi, pas, pascal diff, patch groovy js, jscript, javascript java jfx, javafx perl, pl php plain, text ps, powershell py, python rails, ror, ruby scala sql vb, vbnet xml, xhtml, xslt, html, xhtml Above aliases can be used at: class="brush: alias" while embedding your code in the Blog. Another easy way supported by SyntaxHighlighter is to enclose the code within:

#########YOUR CODE########
The only catch involved out here is, you have to use encoded HTML while embedding within <pre>tags.
Your code can be converted to HTML Encoded using following easy to use Tool:
http://www.string-functions.com/htmlencode.aspx

Just copy paste your code & generate the encoded HTML Code. Paste the encoded HTML within <pre>tags for correct rendering. Failure to do so might render wrong code, especially < & > brackets.

You can find original post from here      

Friday, April 12, 2013

Drupal views

 
drupal views
Drupal views

What is Views?


The views module allows administrators and site designers to create, manage, and display lists of content. Each list managed by the views module is known as a "view", and the output of a view is known as a "display". Displays are provided in either block or page form, and a single view may have multiple displays. Optional navigation aids, including a system path and menu item, can be set for each page-based display of a view.

 By default, views may be created that list content (a Node view type), content revisions (a Node revisions view type) or users (a User view type). A view may be restricted to members of specific user roles, and may be added, edited or deleted at the views administration page.


For more technical users, Views can be understood as a user interface to compose SQL-queries and to pull information (Content, Users, etc.) from the database and show it on a screen as desired.

Please use this link to find more about drupal views.


10 cool Drupal modules that integrate with Views


1. Views Slideshow

2. Views Accordion

3. Views Horizontal Slider

4. Masonry

5. Views Showcase

6. Views Infinite Scroll

7. FooTable

8. Views Field View

9. Views UI: Edit Basic Settings

10. Draggable Views


You can find more details from this original post .


Using jQuery Masonry in Drupal 7


Masonry is a dynamic grid layout plugin for jQuery. Think of it as the flip-side of CSS floats. Whereas floating arranges elements horizontally then vertically, Masonry arranges elements vertically, positioning each element in the next open spot in the grid. The result minimizes vertical gaps between elements of varying height, just like a mason fitting stones in a wall. More


Use a responsive theme for a transition effect. Really very cool to use :)


Install drush on windows


Drush is a command line shell and scripting interface for Drupal. More


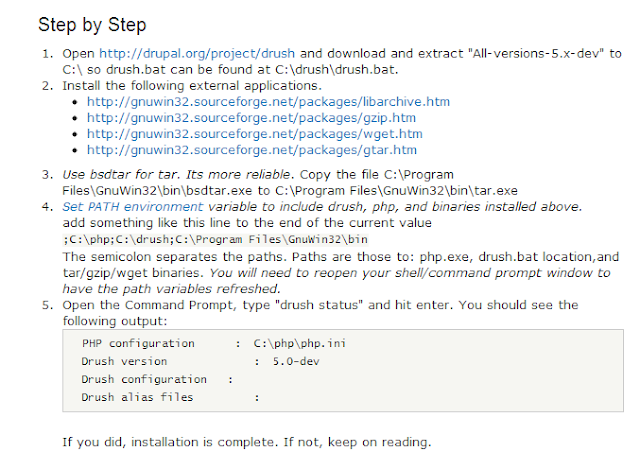
How to install (click here to see more) drush on windows ?


Steps to install :


Very simple steps to install drush on windows.

1) http://drupal.org/node/594744

2) See this image for more help

install drush
You can use the above link to see more


after completing these steps goto step # 3

3) open cmd - goto xamp /htdocs - > drush dl drupal (Will down load drupal package)

4) move to specified path where do you : xamp / htdocs / drupal

5) goto xamp /htdocs/drupal -> drupal si --help

si(site install)

Ex:
drush site-install
--db-url=mysql://root:pass@localhost:port/dbname

6) Example code :

C:\xampp\htdocs\drupal-7.20>drush si standard --db-url=mysql://root:""@localhost
:port/kali --db-su=root --site-name ="kalidas site"

Note : kali is my db name

thats it. Drupal will be installed in your machine.

7) see below image for more help 


install drush on windows
Install drush on windows


Simple drop down menu using HTML & CSS

Html css drop down menu
drop down menu using html & css

Below are the sample codes :


<!DOCTYPE html>
<html xmlns="http://www.w3.org/1999/xhtml">
<head>
<meta http-equiv="Content-Type" content="text/html; charset=utf-8" />
<title>Simple CSS dropdown menu by Kalidasan</title>
<style type="text/css">
ul {
    font-family: Arial, Verdana;
    font-size: 14px;
    margin: 0;
    padding: 0;
    list-style: none;
}
ul li {
    display: block;
    position: relative;
    float: left;
}
li ul {
    display: none;
}
ul li a {
    display: block;
    text-decoration: none;
    color: #ffffff;
    border-top: 1px solid #ffffff;
    padding: 5px 15px 5px 15px;
    background: #1e7c9a;
    margin-left: 1px;
    white-space: nowrap;
}
ul li a:hover {
background: #3b3b3b;
}
li:hover ul {
    display: block;
    position: absolute;
}
li:hover li {
    float: none;
    font-size: 11px;
}
li:hover a { background: #3b3b3b; }
li:hover li a:hover {
    background: #1e7c9a;
}

</style>
</head>

<body>


<ul id="menu">
<li><a href="#">Home</a></li>
<li><a href="#">Portfolio</a>
<ul>
<li><a href="#">Web Design</a></li>
<li><a href="#">Graphic Design</a></li>
<li><a href="#">Logo Design</a></li>
<li><a href="#">Blog Design</a></li>
</ul>
</li>
<li><a href="#">Projects</a>
<ul>
<li><a href="#">This is a project</a></li>
<li><a href="#">So is this</a></li>
<li><a href="#">and this</a></li>
<li><a href="#">don't forget this too</a></li>
</ul>
</li>
<li><a href="#">Contact</a>
<ul>
<li><a href="#">Support</a></li>
<li><a href="#">Quote</a></li>
<li><a href="#">General Enquiry</a></li>
</ul>
</li>
</ul>
</body>
</html>